David Arms // Conversations with Creatives

Photo by Jeremy Cowart (all other photos are by me, which is why they look less professional ;) 

Photo by Jeremy Cowart (all other photos are by me, which is why they look less professional ;) 

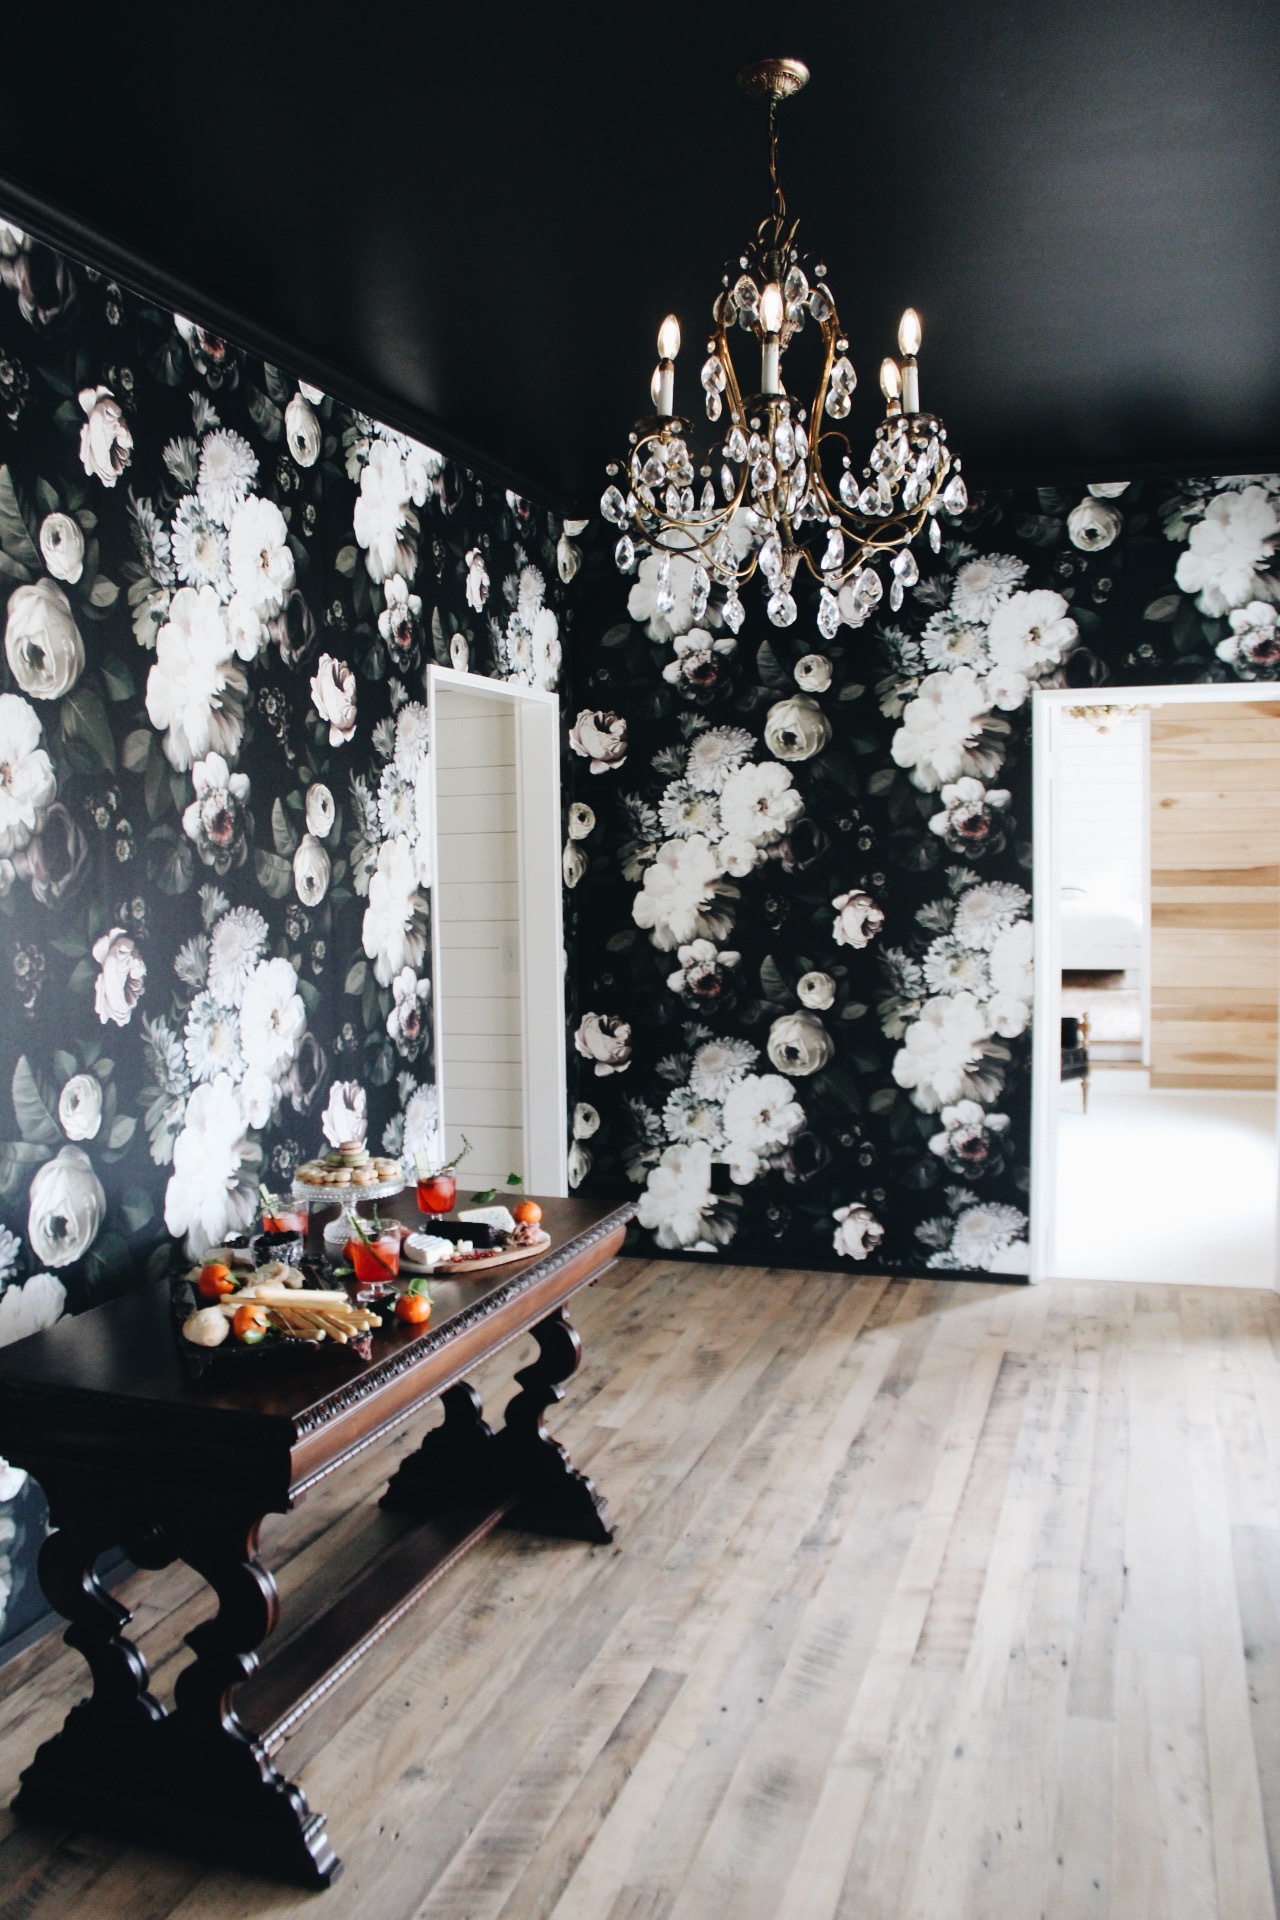
As I walked into David's studio it was filled with the aroma of a perfect blend of pachouli, coffee, and the sweet scent of pipe tobacco. David's studio greets you with a warmth, just like his gallery in Leiper's Fork. Both are more like meticulously curated museums than anything else, but not the cold and sterile kind.  They almost hug you into them. Not only is David an amazing artist, but he also has an eye for antiques and carefully crafted artisan items, and his hand picked collection is nothing short of marvelous. 

I have had the pleasure of knowing David for years.  I grew up with his kids, living next door to their family. I have had the honor of watching his creativity as it's manifested in so many different ways over the years.  When I was young, my sister and I would go over to their house what seemed like daily.  There was always an art project and freshly baked brownies.  These are some of my favorite childhood memories and I truly believe that growing up with the Arms has had a huge part in why I do what I do today.  

When I began to think about creating a series where I document conversations with creative entrepreneurs, it's no surprise that David was the first person I thought of. 

FD669651-9A5F-4F77-9A0B-87CC37D63D02.JPG


What do you do and how did you get started?

My path has been so windy and crooked. Everything I have been in to a large degree, I didn't pursue.  There was company in town putting on an event, and they realized the person they had doing all the visual aspects for the event wasn't going to pan out- so they started asking around and someone said " I know a guy " and they ended up recommending me- Why? I had no idea. We had a very short time to do it, and pulled it off.  Then they called me into their office and told me they wanted me to take all of their next year projects.  The clients were big, Acura, American Honda.  Somehow I ended up starting off with huge clients.  This was the late 80s, early 90s, and the amount companies were spending on events was ridiculous, but it was the norm. It was crazy the events I got to do.  It pushed me hard and was the most stressful work I ever did.  Once the concept and budget were established, I kind of just got to run with it, but you better get it done and exceed expectations.  My favorite project was for American Honda.  We created a snow village inside all these a joining ballrooms- it looked like you were walking through a town.  The coffee shops, restaurants, and bars all worked- you could go in them.  We were inside and had horse drawn carriages inside.  It was snowing outside and it was incredible.  I felt guilty because I didn't know a thing and was getting thrown into these huge projects. I didn't know anything about events, but I had to act like I did.  I showed confidence.  You had to make sure that you got everything done and when they opened the doors, it was magic. 

At that point were you painting?

No, never.  Only as a child.  I would draw every now and then, but that was about it.  The event industry was extremely stressful- extremely.  I would be gone chunks of time- it was nothing to be gone two weeks.  Michelle and I lived in Inglewood, and we had a big wall and couldn't afford a painting that large at that time, and I thought, "I can do something." We had a great, big frame, and I thought, I'm just going to piddle at this.  Soon after, people started seeing the work and becoming interested in it. I had a woman that wanted to start repping my work.  After that, I started selling my work at Bennett Galleries and some shows, and it was really just like, "where did this come from." I was literally burning the candle at both ends. I was working two more than full time jobs at once.  We hadn't had children yet because I couldn't imagine having a child and then being gone for weeks at a time, so it just kept delaying us having a child. We finally decided to have a child, and the art career was going so full time. It's funny, there's a GALA awards where events are nominated for these things- I had won a few over the years. They had had me design the GALA that year, and I didn't realize they were giving me the "award of excellence" that year, and the same night I said, "I'm leaving the industry." My last event was the Swan Ball in June and Shelly, my first daughter, was born in July. God always always had a plan and was one step ahead.  Just like that first event, I had no idea it would open an immediate door to all those events I could have never gotten if I'd tried. I was full time artist as of that June, and it's been almost 22 years since then, and then the gallery came along almost 6 years ago...and none of that started until my mid- 30s

I've got a close friend who is one of the top songwriters in town, and it all came later for him too.  You know, he talks to all these 20-somethings who think if they haven't made it, it's over, and at 20-something, we had no idea where we were going or what was coming. If you would have asked me what I wanted to do when I was a child, I probably would have said artist, that would have been like a dream, but in that generation it wasn't an option for a man to raise a family and be an artist.  It wasn't even a consideration, but you guys have that as an option.  There are so many creative fields, or if there is something you want to do that's not out there, you can just kind of make it up. But I think the pressure of that would be strong. 

55E85DBB-870E-4FCD-A6DC-F6CFDE78B349.JPG

In your work, where do you tend to draw most of your inspiration, or how do you stay inspired?

Sometimes thats hard, and other times it's easy. The no-fail place is nature, it always gives ya something.  The hard part is stopping to get out in it.  I am a move forward kind of guy and can just keep going, and going, and going, but there's a downside to that, and Michelle pushes me often saying "stop and go somewhere different." One time she got me to do it, and Lilly (daughter) and I got out and went to the Frist. There was a small area of a work of art where the shapes and colors really inspired me.  It changed my thought and gave me something fresh. 

With your Gallery, when did you decide that you wanted to do that, or did that kind of organically come into play also?

It's organic too, my whole life's organic, honestly. It's kind of the way I even do business- organically, not everything at once.  I was showing at multiple galleries in multiple states, and it was good to me- I mean, Atlanta was so good to me and Nasvhille has always been good to me.  It was in the back of my mind because I knew I always wanted to show art how I wanted to, and I knew if I created a gallery, it wouldn't be conventional.  I thought, " wouldn't it be fun to show art the way you wanted to do it". I didn't want a stuffy gallery, I wanted it to be friendly and warm.  So I started listing parts of town I'd consider and I'd go drive around or walk in those parts of town and I started checking things off, and Leiper's Fork is the only one that stayed on the list. I'd go visit Lisa Fox out there and I told her I was toying with the idea of a gallery.  One day, she called and said, " I don't know what you're doing, but whatever it is, drop it and get out here right now." So I did.  That barn, the people who were originally renovating it were pretty far along, and Lisa went down to look at it.  I think she knew it was a perfect fit and when she walked in, she thought, "this is David Arms."

It was pretty sparse at first really.  As I could afford it, I would invest in the next piece and the next piece. Now it functions like it really needs to.  I wanted to do just a little bit at a time and let it take care of itself instead of going out and getting the money.  I've just let it pay for itself as it's went along. I tell the staff, pretend like someone is just coming in your living room.  I want it to feel warm and welcoming.  The stuff in there is totally curated- its quirky, but it's very authentic.  It's only stuff that I love.  We make as much of the product as we can and then fill in with things that I love.  

0EBDBAD8-29C2-4D6A-973D-E34E6BE84EBF.JPG

What does a normal day look like for you? 

It's really inconsistent.  In some ways I am a very routine person, you know, my family laughs at me because I eat the same bowl of cereal every night before bed.  I always try to be out in the studio every morning by 5am- that's my read, pray, write time.  It's a great painting day if I can spend 10-12 hours at the easel, but that's rare. That's something I always tell young people who are wanting to do what I do- "are you willing to put in the time."  I really don't get days off.  I wouldn't have it any other way, though.  I can be in here and do what I want to do, but I am willing to do the work.  You've got to be willing to do the work.  I think if I had to work away the hours that I do, I couldn't do it. You've got to be able to adapt.  From the outside, people look at what I do like, "man, you can just get up when you want to- you can paint when you get inspired" and it just doesn't work that way. You have to be disciplined to get anywhere in anything.

Are there any times that you failed or made mistakes business-wise that you feel like have made you better?

Yes- it's hard to remember specifics.  When I started painting I had no idea.  And then when I went on to open the retail space, I really had no idea what I was doing.  You just kind of have to figure it out on your own and you just have to know that you're going to make some mistakes.  I don't think you beat yourself up over it, you can be disappointed that they happened, but it's what you do with that. You better yourself in that area.  It's when you don't learn from them that I think it's a problem. You just have to throw a little grace in there, and that's hard for me because I'm really hard on myself and have high expectations for myself.  But I almost just have to plan on them.  If you're thorough on the front end, you have a lot better odds on the back end.

If you were giving a couple lines of advice to someone who was trying to start a business, what would you tell them?

The first that comes to mind is to be sure to be passionate about whatever it is you want to do.  It's going to be hard work.  The passion will make up for a lot.  I can get so much energy and fulfillment off the passion side of my work that it makes up for the hard work and long hours.  It sure is a nice cushion to have that.  And it keeps you going, it really does. 

You have to be willing to work dog-gone hard.  I always try to teach my kids, go above and beyond, do more than is expected, and always be early.  It's going to pay off.  It just is.  The law of averages say that it just is... And you've made someone else's life better, you feel good about what you've done.  In the event world, I would just think, "I'm going to make it better than they even think it can be." Now with painting, I've done all these paintings, but I still want to make my best one.

IMG_8114.JPG

My conversation with David was nothing short of inspiring, and so encouraging as a young entrepreneur.  If you want to learn more about David and his work, you can do so here.  If you have a chance, take the time to go out and visit his gallery.  You won't regret it! 

8FEFE62B-F2B5-4F8A-A649-9E15CB52DD83.jpeg


How to Galentines with Your Gal Pals

If you've watched Parks and Rec, you are probably pretty familiar with the idea of Galentine's day.  I, for one, am all about it.  Who doesn't love a chance to celebrate with your gals.  I wanted to put together an easy and affordable "how to" on how to have an epic get together with your girlfriends.  I tried to use a lot of things that I had around my house, but I also purchased a few things. In coming up with this blog post I made a few things priority: a beautiful table scape, a great charcuterie board, and a custom cocktail (who doesn't love a drink unique to the occasion!).  

We'll start with the charcuterie.  Trader Joe's is my favorite place to get all the fixins' for a good cheese board.  I went for three different types of cheese, some prosciutto and salami, a baguette, some crispy bread sticks, as well as some blackberries, pomegranate seeds, truffle oil almonds, and some fig jam for garnish.  We also decided to put our desserts on the same table.  I was trying to keep things simple so we snagged some heart shaped shortbreads with raspberry jam from Trader Joe's, as well as some delectable pistachio and raspberry macaroons from Whole Foods. 

87E03F16-D7C8-4B87-BE3B-91388D2FF2E9.JPG
DCEC29D7-9D7F-442B-9EF8-63EB6075CBCF.JPG
53CB5224-33C9-4EBB-84CF-42D744A44669.JPG
E2246CA5-9605-4D8F-B791-AE09E22A7303.JPG

Next, we move onto the table scape.  I wanted to put together a table scape that was girly, but not too girly.  I also wanted to keep it affordable.  The first things I found that kind of set the tone for the whole table were the placemats and place cards from Hester & Cook.  Hester & Cook is a really fun local store here in Nashville.  If you are planning a party, definitely go check them out.  They specialize in unique paper goods and everything in their store is AH-MAZING.  

I used matte black plates that I bought a couple years ago from World Market.  I also purchased the napkins on clearance at World Market, as well as the gold rimmed goblets (not on clearance, but still a good deal!).

DCBCA0A1-6495-4EC1-B0B1-4C8098D8F767.jpg
93A784F0-62FB-4BA2-8A90-2A383CCE442B.jpg

The antique gold flatware was a flea market steal a few years back, as well as the antique champagne cooler holding the flowers.  I wanted to mix modern and antique and I think the two matte black candle holders that are Hearth & Hand by Magnolia for Target really helped do that. The jewel cut glasses also came from Target and I love them!   

A89304D5-73CF-45FE-89D1-E0AFDD5DD8E0.jpg
F24C79E9-721F-40A1-AE95-AC338FE22976.jpg
C45BB532-6D19-4807-B955-A9D6E80A89A8.jpg

I wanted to keep it on the cheap with the florals so they all came from the grocery store:) . I decided to knot the napkins for a bit of a more casual look.  I decided to go with the black tapers for a bit of a moodier vibe. I was so happy with the way this all came together.  It seems like the perfect place to host your gal pals to me! 

F75485F3-6488-4B9F-9050-96D491E544A2.jpg
8F353EEB-331D-43AA-9E04-B1A53E1FE069.jpg
94A089F6-3335-40FC-8B43-71C55851E265.jpg

We wanted to create a custom cocktail that you can easily create at home to celebrate! We are calling it the l’Eau de Saint-Valentin:

l’Eau de Saint-Valentin

((The Water Of Valentines))

Yield: 2

INGREDIENTS

3 oz Eden Mill Love Gin

1.5 oz Berry Syrup*

1 Lime

2 Small Cucumber Wedges

Tonic Water

INSTRUCTIONS

  1. Muddle gin, lime & cucumber until fully juiced.
  2. Fill glasses with ice, strain and divide juice.
  3. Top with tonic water and drizzle Berry Syrup.
  4. Garnish with a cucumber spear, a blackberry and a sprig of thyme.

BERRY SYRUP RECIPE

5 Blackberries

5 Rasberries

2 Tbsp Maple Syrup

2 Tbsp Water

  1. Place all ingredients in saucepan on low for 10 minutes.
  2. Press juices from berries and stir intermittently.
  3. Strain and chill.

Recipe curtesy of my friend, Bede Benjamin-Korporaal.  Also wanted to give a shout out to his amazing wife and one of my best friends, Izzy for being awesome and helping me all day.  You guys are the best <3 

21B78843-2514-4D25-BD46-644CF9C6A97D.jpg

Happy Galentines, y'all. 

DIY Clay Bead Necklace

I know this post doesn't have anything to do with weddings, and I'm ok with that.  I wanted to share a fun necklace I made for myself with you.  You can make this for yourself or as a simple gift to give someone.  The best part?  It is SO easy to make.  It only takes about 5 minutes of active time, and can cost as little as $4 to make.  I wear mine all the time and every time I do, I get asked where I bought it.  Let's get started! 

SUPPLIES:

  • Sculpey bakeable clay.  $2.79 ( Michaels ).  I used 2 different packs of clay.  The colors I used are Pearl and Beige (which is actually a light pink).
  • Some type of durable string.  I found some cording in the sale section at Michaels for $0.49.  
  • A Skewer to make the hole in the bead
  • A Baking Sheet
  • An Oven


STEP ONE:

Break your clay into the pieces you will need to make the beads.  Since I was using a marbled effect on my necklace.  I used 1/4th of each color of make the larger middle bead, and 1/8th of each color to make each of the two smaller beads. Sculpey makes this super easy because their clay is already split into fourths.

STEP TWO:

Roll out your pieces of clay to make little snakes (elementary school term, I know.), then combine the two colors for each bead and roll them together.  For instance, the 1/4th piece of pearl clay and the 1/4th piece of beige clay should be combined, as well as the  1/8th piece of pearl clay and the 1/8th piece of beige clay (there should be two of these). This should leave you with three little clay snakes.

STEP THREE:

You should now have three pieces of clay, each with two colors (if you are doing the marbled version).  Take each piece and work it into a ball.  If you are only using one color, this step is super simple.  If you are using two colors for the marbled effect, the more you work the clay, the more marbled it looks, but be sure not to over work it.

STEP FOUR:

Use your skewer (or something similar) to poke a hole through your bead.  The bead will probably become slightly mis-shaped during this process, but it is very easy to fix.  Make sure that the hole you make is big enough and clear enough for your string to easily fit through.

STEP FIVE:

Now its time to bake the beads.  Just place your beads on a baking sheet and bake them at 275° F for 15 minutes.

STEP SIX:

Once your beads are done baking, remove them from the oven and let them cool for about 10 minutes.  They may appear to have some cracks in them when you remove them from the oven. As they cool, these cracks typically seem to go away.  Once they are cool, string your beads.  You can make the length of your string however long you'd like.  Simply tie the ends together.  There is no need for a clasp.

STEP SEVEN:

That's it!  Now you have a new piece of jewelry and you can make one for all your friends :)   

Share your pictures with me (@ac_weddings, alexandreacantrell@gmail.com) if you end up making one!  I would love to see what you guys come up with!  

Special shout out to my sister, Olivia, for taking these pictures.  Neither of us are photographers, but we still had fun pretending! 

11 non-traditional centerpieces that I love

Don't get me wrong, I love flowers.  They are actually probably one of my favorite things.  I am constantly buying new flowers and making new arrangements for the antique and beautifully tarnished champagne cooler and sits in the middle of my kitchen table.  One thing that I have noticed with almost every single one of my brides is that they are shocked when they get the quote from the florist they want to use for their wedding.  Flowers aren't cheap.  One way to cut back on the cost of flowers for your wedding is to pick a non traditional centerpiece.  I have curated some images of centerpieces that I love.  These are centerpieces that you don't typically see at weddings, but if done right, people won't be able to stop talking about them.

Image via Free People

Image via Free People

If you are having an outdoor wedding or a wedding more on the casual side, a centerpiece like this could really set your wedding apart.  This stick tee pee could be easily constructed using some twigs and the string of your choice.  It would look really cute with an air plant, succulents, or maybe even some small votive candles underneath.


Image via Etsy

Image via Etsy

Picture some beautiful geodes, air plants and some greenery arranged in the center of your table.  I think this idea could be really cool.  You can find geodes for cheap on eBay or at your local antique stores.  Air plants can be found at local nurseries.  If you don't want to spend money on greenery, you can always cut some from your backyard and keep if fresh by sticking it in a little bit of water.


Image vis Her New Tribe

Image vis Her New Tribe

I love the idea of potted plants as a centerpiece, so much so that I am going to give you two different ideas in this blog post.  I think that succulents and cacti potted in terra cotta pots are a great statement centerpiece.  This could work in spring, summer, or fall weddings.  You can buy cacti and succulents and your local Home Depot or Lowes for next to nothing.  Terra Cotta pots can also be found at local hardware stores for around $1 a piece... I'd say thats pretty good.  You could even mix in some vintage pieces for potting your plants from antique or thrift stores.


Image source Unknown

Image source Unknown

Let me just say this, there is nothing more dreamy to me than melting pillar candles grouped together.  This one is a little tricky because most venues don't allow you to have candles outside of a container.  If you find one that does, please let me know because I will love them forever.  Regardless, whether a backyard dinner party or a wedding, pillar candles are pretty beautiful on their own.


Image via Ali Harper

Image via Ali Harper

Another candle centerpiece.. they are just so pretty.  I'm also a sucker for taper candles.  You can find antique candle holder like this at a flea market, antique store, thrift store, or heck, you may even know someone who has a lot you can borrow.  Candles grouped together like this are beautiful on their own... you don't even have to add anything to them! 


Image via TwoFold LA

Image via TwoFold LA

How gorgeous is this for a beach inspired wedding.  Coral as a statement centerpiece with taper candles and shells surrounding it all...  I think this is divine.  If I was having a beach wedding, I would want my centerpieces to look like this.

Image via Lauren Michal

Image via Lauren Michal

One last candle centerpiece... This is seriously so easy and cost next to nothing.  I'm not a fan of wine bottles as centerpieces, but I am a fan of this.  Wine bottles (labels removed) with taper candles.  This would look so good in a dimly lit room.  You can collect wine bottles, ask your friends to collect wine bottles, or even ask local restaurants if you could have the ones they are going to throw out.  An odd number of these bad boys grouped together in the center of your table and voila, you have yourself a good looking (and cheap) centerpiece.  If want your bottles to be really wax covered, I would suggest melting a candle in each one before the big day, and then adding new candles for the actual wedding.

Image via OnceWed

Image via OnceWed

This is once of those ideas that is so simple, yet so pretty.  A simple fern leaf put in a vase.  I would do several of these gathered on a table.  For these, you could literally just buy a few ferns from a nursery /Home Depot/Lowes, cut off the leaves, and place them in a thin necked vase.  I would look for vases at thrift stores.  If you are looking to buy vases that are all the same, a good place to start would be save-on-crafts.com

Image via Divine Day Photography

Image via Divine Day Photography

This is one of my absolute favorites.  This idea consists of potted herbs and candles in votives (you really could just do the herbs by themselves).  You can buy herbs for super cheap at you local Home Depot/Lowes along with terra cotta pots. For the smaller candles and votives, I would look on amazon, save-on-crafts.com- or even eBay.  You may even be able to find some at some yard sales (I have found a TON that way).  You could also make this centerpiece more unique by using vintage planters found at thrift stores, antique stores, flea markets, or yard sales. Bonus: the herbs smell like Heaven.

Image via Brandon Chesbro

Image via Brandon Chesbro

This idea is SO simple and the only thing you have to pay for is the vases.  Magnolia blooms and leaves are so gorgeous on their own, all you have to do is put them in a little water after they are cut.  You would only be able to use the blooms for a summer wedding, but the leaves can be used all year round.  I would do several to a table.

Image via Etsy

Image via Etsy

This picture isn't necessarily a good representation of what you could do with feathers, although I love the antique trophy they are placed in.  To liven these up a little bit more, I would add in some sticks for height and more texture, plus a little greenery for a pop of color.  These would look  really good mixed in with some fern leaves!